Showing posts with label router. Show all posts

Upgrading to Gigabit and Wireless-N

Upgrading to Gigabit and Wireless-N
There are many WiFi-N routers on the market, but add the Gigabit requirement, and this choice drops dramatically. Add a further requirement for an embedded ADSL modem, and you're left with just a handful of candidates left.

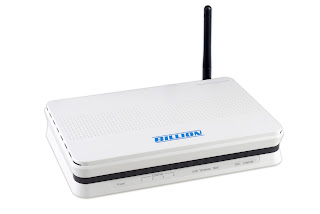
With time, I accumulated devices with either Gigabit or Wifi-n connectivity (Bluray player LG BD390, Synology NAS DS109, Acer Liquid MT smartphone), so I  decommissioned my good ol'7402GXL for the Billion 7800N with WiFi-n and Gigabit capabilities.

There are several reasons -other than just using less power sockets- for preferring an ADSL router with embedded modem, but for sure, this decision reduces the available options. In Europe, this seems to leave Billion 7800N, Cisco WAG320N and Netgear DGN3500 as only possible candidates (all Broadcom BCM6358 chipset-based).
Although I didn't mind trying something different than Billion (just for a change), the unconvincing user reviews on the Cisco and Netgear models pleaded for staying with the brand that I know since 2008 for its reliability and for the quality of its technical support service.

The first  most striking difference in the 7800N compared to the 7402GXL, is the size, about 30% bigger (15.5cm x 23cm).  Next come the obvious addition of 2 antennas and the absence of USB connection for a 3G modem.
The interface is similar to the 7402GXL, except that there's no pre-defined firewall rules so you need to define your restrictions from scratch over the unique "allow all" initial rule.
The chipset is also different: Broadcom instead of Connexan. Apparently it gives a little less options when configuring from the Command Line Interface (like adding port forwarding...).
The Billion 7800N is not really a new router and not the cheapest neither (~130€), but considering its outstanding reliability, it's well worth the money.

The companion router
To be complete, the solution had to include a companion Gigabit+Wifi-N router, to play the role of Wireless range extender.
Since a modem was not necessary here, the choice was larger:
Buffalo WZR-HP-G300NH v2, Zyxel NBG4604, D-Link DIR 645, TRENDnet TEW-639GR and TP-Link TL-WR1043ND
It didn't take too long to opt for the later based on its reviews and price (~50€)


These two guys work perfectly together and all it takes to set up the TP Link router as a bridge is to switch off its DHCP while designating the other router as the primary DNS server. I gave the same Access Point name to both boxes but distinct and non-overlapping Wi-Fi channels. This way, when my netbook or phone leaves the coverage area of one, it automatically connects to the other.


One remarkable feature of this router is the excellent user interface, complete and well structured, with a detailed contextual help for every single option, explaining how and why to use them. Something that Billion leaves to Google.


More info:
Billion Bipac 7800N: http://www.billion.uk.com/product/wireless/7800n.htm
TP-LINK WR1043ND: http://www.tp-link.com/en/products/details/?model=TL-WR1043ND

Demo UI for 7800N: http://www.billion.com/edu/EWAN/7800N_GUI/
Demo UI for WR1043ND: http://www.tp-link.com/simulator/tl-wr1043nd/index.htm

Read More

VPN through Billion 7402GXL

VPN through Billion 7402GXL
Until recently, setting up a PPTP VPN passthrough on my Billion  7402GXL router was impossible, and for once, it turns out it was not all my fault...


Unlike most other routers on the market, there's no specific "PPTP Passtrough" option in the 7402GXL, but the method to allow this on the Billion router is quite simple:

Under the Virtual Server > Port Forwarding section, define a redirection for PPTP port and another for GRE protocol pointing to the intranet IP of the VPN server.


And it the firewall is enabled, define an rule to allow the PPTP port 1723 to go through (In and Out)


In theory, this should have done the trick, but not for me: despite the troublesome firewall being off, the VPN client was still hitting an invisible wall, and there was no log entry whatsoever in the router or at the VPN server end to give any clue.

Resolution
I contacted Billion technical support to check for any newer firmware for my model, which was in 6.22b (which, despite being 6 months old is only confidentially mentioned on the UK forum).
They provided me with the version 6.24b(UK build). It appears to be one of the latest available (January 2012) according to the Australian site (no changelog available).

Once installed, the VPN connection worked immediately with the same set of rules and forwarding.

So, it is possibly a bug that the latest firmware eventually resolved. Of course, it is also possible that resetting the router to factory settings -which is a requirement when upgrading a firmware for Billion's devices- cleaned up something corrupted in the configuration.

Read More

3G Router with Usage Allowance control

3G Router with Usage Allowance control
Following a recent horror story with my 3G Broadband operator, I started to look for a router with a security
feature that would warn me when I reach the data usage limit and, if possible, disconnect the modem.


NetGear introduced the "Traffic Meter" in its DGN range, but this is only for ADSL, and even if I plan to stop switch to ADSL soon, it is convenient to have both in one box.

The closest match was the 4GR from Dovado with its Traffic Limit Notification and the possibility to control the router remotely. The only thing that held me back was the absence of firewall.

So I turned to the tech. support of my current ADSL/3G router, the Billion Bipac 7402GXL to see if they had plan for such a feature. They replied with a Release Candidate of their latest firmware v.6.03 which does have exactly what I need!

A new feature called Usage Allowance now appears in the WAN Connection section of the router. It gives you the option to set a traffic limit (Up/Down separately or together) based on a given billing period. Once the limit is reached, the router sends an email alert and/or disconnect the modem.


 There are 3 limitations to keep in mind though:

- This update is not compatible with configuration backup from a previous version. So you need to factory-reset and re-configure the box manually.
- The feature is only for 3G. A similar function for ADSL would be welcome.
- According to their technical support, the traffic limit currently cannot work if the value exceeds 3GB. It's not clear what happens if you set a higher value...maybe you don't get notified at all ?

I'm soon testing this live with the new billing period coming. I've also installed a SNMP monitor that gives an instant reading of the router traffic: Online Eye


Unpublished firmware updates for Series 7 routers can be obtained by opening a ticket with Billion support. For some reason, Billion UK recommend against using firmwares from its Australian counterpart.
Read More

How to access your IP camera from the Internet

How to access your IP camera from the Internet
True geeks come usually with 3 major faults:  they don't do backups, they don't quarantine new fishes, and, they never read the manual!

What follows is actually quite well explained in the IP camera manuals, but remains the most frequently asked question:
"How do I access my IP camera from the Web ?" 


Taking from the point where your IP camera is accessible from inside your home network, the very next thing you want is to access it from outside as well, using a PC or a phone, on holiday or at your workplace.

This short guide assumes that your camera connects to a router, the most common scenario, so the ADSL and DDNS settings of the camera itself are not used here. All the job will be done on the router. If you do dial-up from the camera, you can still quite easily transpose the instructions below to your case as soon as you get the idea.

1. Dynamic DNS setup
While not vital, using dynamic DNS service will make your life easier. Without it, you need to know what external IP address your ISP assigned to you and use it as part of the url to access your network from the outside (http://10.11.12.13). This IP address is likely leased for a limited time and subject to change, so you'd need to keep track of it.

Upon registration, the dynamic DNS service will give you a list of domains to choose from, and will map it to your external IP address.

The router will interact with the dynamic DNS service to update it with any IP address change. Most routers have a dedicated section where to enter your Dynamic DNS account details.

First thing to do, is to retrieve the section dedicated to DDNS setup in your router configuration and check what choice of DNS service providers it available (PortForward.com has screenshots from many routers to help you locating the right setup page for your model.), this varies from manufacturers, but almost all will support the most popular one: dyndns.com.  Pick one available and then go to their corresponding web site to create an account.

In this example, we will choose to map our external IP address with http://mylab.homedns.org


You will be told if the name+domain name combination is already taken and will have to choose another one.

Once this is done, you just need to enter your login and domain name into your router:
Your router will now keep dyndns automatically updated with any ip address change.
 
2. Port forwarding
Now that  the url http://mylab.homedns.org leads to your external address, you still need to tell the router where this incoming traffic will be redirected inside your lan.

In this example, suppose you have the following devices in service:

IPCam1 on 192.168.1.100 using port 80
IPCam2 on 192.168.1.101 using port 80
  NAS  on 192.168.1.102 using port 80


The port forwarding will just tell to which of them the incoming traffic will be forwarded.

Here, if we want http://mylab.homedns.org to lead to the internal http://192.168.1.100, we need to set this up in the router as follow:

The port forwarding section is generally located in the Virtual Server category of the router.

Again, portforward.com will help you find the right section on any router model.

You can setup several port forwarding entries so the other devices are accessible as well, but the incoming port needs to be different for each of them:

- incoming http://mylab.homeftp.org:81 goes to IPCam2 internal http://192.168.1.101(:80)


- incoming http://mylab.homeftp.org:82 goes to NAS internal http://192.168.1.102(:80)


Please note: For the port forwarding to work consistently, you must assign fixed internal IP addresses for your devices in the router's DHCP table. Make sure also that your router firewall doesn't block the incoming traffic on ports used.


3. Multi-device setup
IP cameras like Foscam offer the convenience to access up to 9 ip cameras through the interface of one.
If you use this feature, you probably entered the internal ip addresses in the Multi-Device section of the ActiveX configuration interface.
So when connecting from the Internet, you will realize that only the master camera is accessible and the others can't be viewed, and show a steady yellow dot in the device status section.

To sort this out, you need to go back to the multi-device setup and replace the internal IP addresses by their respective DNS paths and ports.


For your intranet usage, if you don't like the idea of that traffic out-and-in, you still can configure the multi-device section of your other camera with the internal ip addresses and use this one at home.

Additional reading (from DynDNS.org)
Routers and Port Forwarding
Open Port tool 
to check if some ports are blocked by your ISP.
Read More