My first FI8904W! (Outdoor IP camera)

My first FI8904W! (Outdoor IP camera)
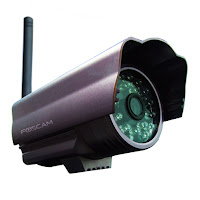
Since there is no suitable solution to place one of my FI8908W outside, I decided eventually to go for a proper outdoor IP camera.

So I ordered a FI8904W and decided I'd become a bit more knowledgeable about it by giving it a thorough inspection on arrival.


This camera came with standard 6mm lens (8mm, 12mm and wide-angle 3.6mm are also available according to the description the box)
The manufacturing date is October 2009 so it comes with the firmware 11.14.1.46.
It also exists in different colours. According to the box, mine is "Coffee".
I ignore what substance you must ingest to see purple coffee, but someone in China's got the secret...

So my first experiment was to see if I could change the lens, with a wide-angle from my 6-lens pack (found at DX). While these lenses leave a unsightly gap in the indoor FI8908W, they fit the FI8904W perfectly.

It is not visible but the front of the camera can be unscrewed to access the lens compartment. It takes some grip but eventually will come off nicely.


Before you go ahead with removing the lens, check first for that tiny screw on the side of the lens base.
See it?  It's there to keep the focus locked. You need to release this guy a few turns and then only can you safely unscrew the lens anti-clockwise all the way.


Pay attention not to lose the rubber ring that isolates the lens chamber from the electronic components.


I picked the 2.8mm lens and screwed it in (with the rubber ring) until the focus was ok. I was lucky with this focal but apparently, other don't give good results at all, so you need to experiment.


A quick look inside

Opening the rear part of the camera just requires to unscrew the large hexagonal ring around the wire, then unscrew all 4 small hexagonal screws, which will void the warranty of course (in my case it would cost the price of the camera to ship it back to the reseller anyway...)


What I wanted to find is located on the main pcb: there's a jtag port (marked J2). As for most recent cameras, the pins are no longer present but, with a proper solder, it will be possible to make a serial connection and, if it gets bricked one day, perform the recovery operation previously explained in this article (same recovery files apply).


Below is a comparison between the factory lens and the 2.8mm lens field of vision.


Night vision (2.8mm):
Read More

Shortcuts to some IP Camera functions

Shortcuts to some IP Camera functions
The following is a selection of CGI functions that can be used with Foscam ip cameras. They are issued through the URL line of a browser and can be used as convenient shortcuts to features that are not ideally accessible in the original UI, like the network activity led, which is located on a page that requires a reboot while the function itself could be activated instantly.


http://[ipcam]/set_misc.cgi?led_mode=2
this will turn off the green activity led instantly.
The valid values are as follow:
led_mode=0 - the green led blinks only once connected.
led_mode=1 - the green led blinks while searching for a connection and when connected.
led_mode=2 - the green led is always off.

See here for the meaning of the different blinking rates.

http://[ipcam]/set_misc.cgi?ptz_center_onstart=0
the camera won't auto-rotate any more when restarting, so you won't need to re-position it any longer upon rebooting.
 
http://[ipcam]/set_misc.cgi?ptz_auto_patrol_interval=30
This function is currently not implemented in the user interface and  instructs the camera  to start a patrol at a defined interval, here 30 seconds.
The patrol type is defined by this other command: 
http://[ipcam]/set_misc.cgi?ptz_auto_patrol_type=1
Possible values: 0: None; 1: horizontal; 2: vertical; 3: Horizontal + Vertical

http://[ipcam]/set_misc.cgi?ptz_patrol_rate= 20
The value provided will defined how fast the camera will rotate on patrol, here 20 is the default.
Fastest speed = 0. Slowest speed = 100.

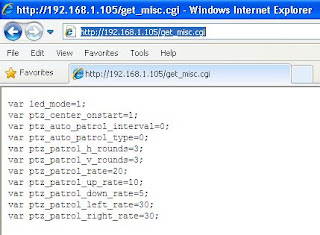
http://[ipcam]/get_misc.cgi
Returns all the current values  for the functions above.

http://[ipcam]/get_log.cgi
Displays the visits log

http://[ipcam]/get_params.cgi
Returns the complete configuration of the camera.

All the commands can be chained in the same url by using & as separator.


(complete documentation can be found on this page)
Read More

Power Failure Light

Power Failure Light
There are so many power failures in my area that my next post might well be a review on a clever UPS unit. But the last incident reminded me of a silent but clever gadget I installed some time ago.
Usually these power failures (about twice a month) occur when the weather outside is terrible and the light very low, leaving you in almost total darkness. This is no longer a problem since I fitted these Emergency Led lights turning on instantly.

This particular model, occasionally sold by Aldi stores but also available on the Web if you know where to look, turns out to be the most clever version of led-based power failure torch on the market: beside the obvious advantage of using leds, the Starlight 100 from Topcom is IP44 splash proof and features an induction charger, adding to the safety of use. The torch body contains standard AA rechargeable batteries.

When plugged to the wall in normal situation, it charges and serves as a night light with a single soft blue led. It turns on its 7 powerful white leds  automatically when taken from the holder or when the power fails.

Another good point is the block of 4 standard AA rechargeable batteries that can be easily replaced by unscrewing the lamp handle.
Read More

Start up guide for new wireless IP camera users

Start up guide for new wireless IP camera users
The information in this post may seem very basic to people who have a wireless IP camera for some time, but, we all tend to forget how confusing and frustrating our first steps may have been setting up these gadgets the very first time.
I'll try to second the network settings chapter in the IP camera manual  (even though a true geek never reads the manual) to help passing the blocking points of the wi-fi setup procedure.
This is based on a Foscam camera but can certainly be used with other wireless cameras.

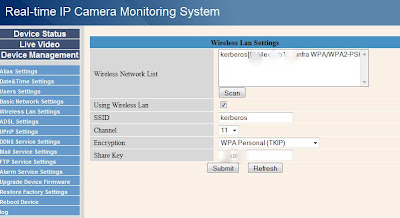
The step that nobody has problem with (usually) is connecting the camera to the network with the Ethernet cable. When this is done, the wireless settings can be accessed from the Administrator section and that's where a first very common error is made:
Many beginners enter an arbitrary name in the SSID field, thinking it will identify the camera on the network. What is needed here, is the name of an access point (typically your wi-fi router).

Also make sure that you choose a supported encryption and prefer WPA to WEP if possible. The channel should also match the one used by the router.


In the most recent firmwares, there is a scan button to detect available access points automatically. If nothing appears after scanning you may need to click the refresh button.


The next step is often unclear as well to newbies: once you click on the Submit button, the camera will start a countdown of 30 seconds to restart. This is the moment to unplug the Ethernet cable. You should have done this within 10 seconds, on FI8908W, it is typically before you hear the short click from the camera speaker preceding the initial rotation sequence. The camera will start looking for a network and, at the condition that there is no more Ethernet connection, a wireless access point will be searched.


If everything goes well, after a few seconds, the green led will the blink much faster than before, indicating that it achieved a wireless connection.


The final step is to check your router's DHCP page for any incoming request, this is likely to be your ip camera (If nothing appears, ensure that you disabled the MAC filtering on your router for the time of the procedure).Just use that ip address in the url of your browser to confirm it is what you expect.
You can then add this address to your static DHCP list and MAC filter exceptions.


Note: The camera needs the router to be in broadcast mode in order to connect, otherwise it will not find the AP. This limitation has been reported to Foscam.


Read More

LG BD390 Blu-Ray player with Wi-Fi

LG BD390 Blu-Ray player with Wi-Fi
I was watching this Blu-Ray player for a few months and after having compared the features and prices with other Samsung and Sony players, it ended up as the logical choice. It took less thant a week to arrive from a German eBay shop that beats my usual providers (Amazon, Komplett, Pixmania) in terms of price and stock availability.

The installation was surprisingly easy and quick: after about 15 minutes, the unit was Network-connected, Region-hacked, and Firmware-updated ! Never mind the user manual was only in German (I downloaded the EN version from lge.com), it was really not necessary!


Network connection: My wireless router Billion Bipack 7402GXL was detected and I could even use its WPS (Wi-Fi protected Setup) function for the first time. In the Wireless setup, the LG BD390 offers a "Push Button" option, which starts a timer of 120 seconds during which I just need to press the WPS button on my router to have all the network information exchanged, saving me from entering manually the encryption type and key. That's all I needed to have the unit connected to the Internet. Repeating the operation later, I've found that it sometimes needs up to 3 retries to have the "Wireless Dynamic IP" setup successfully. Maybe a wireless range issue?

Region Hack: I downloaded the necessary file from multi-region.net and burned the RMTM0000 folder contained in the 6000.iso file.
Two things to consider regarding this hack:
- it is reported to work only on European models for some reason (to verify).
- it may not run if you already updated your firmware to the latest version.  LG Support Web Site keep a few versions back if needed.

The good thing is that the change is persistent, so upgrading the fw afterwards will not affect the hack.

Upon loading the CD containing the hack, a region selection appears where you just need to select the region you want with the up and down keys on the remote (0 for Region Free).

Firmware Update: the BD390 came with a the firmware version 8.08.360.B. I took the time before updating to look around the functions and browsing through the menu. I noticed it was sometimes sluggish, and occasionally even froze (trying to access a .TS file from the local network). If there was a Java console, I bet it would show an endless list of UnhandledExceptions scrolling. A 5 second push on the power button (like on most PC's) was necessary to force the unit to power off.
I had the firmware 8.08.529.B ready on a USB drive, but despite that, the player detected the update on the Internet and offered only this way to update. I found out after that, because I plugged in the USB drive before powering on, the DB390 didn't detect it at boot time. Un-plugging and re-plugging solved the problem.
The update operation took about 5 minutes and ended with the player powering off (not restarting). Upon powering it on again, I verified that the upgrade was in place and noticed that the operations were a bit smoother in general, and the unit generally more stable, even though some glitches are still present.

That's it, the player was set up, with a short review to adapt the display settings so it would work well with my almost-HD television (HD-Ready Samsung LE32R51B)


First use:

I won't give a full technical review, there are many good ones available already, but just my impressions during the first hour of use.

The HOME menu is called by pressing the Home button on the remote and offers 6 different sections:

Movie: that's were the local medias can be played: Movie/Audio disc or USB drive
I played a Divx movie from the USB drive and it loaded instantly, which differs greatly from the almost 2 minutes load time that my SilverCrest DVD reader from Lidl always needed, obviously to fill its buffer. Does it mean that the LG uses faster memory or... doesn't bufferize anything ?
Loading the Blu-Ray version of Ice Age 3 took between 20 seconds to 1 minutes depending...I don't know what! Loading DVD was always faster. I found the unit very silent, particularly after having recently seen a Samsung player in action.
 
Photo: will scan local medias for pictures

Music: will scan local medias for playable music.

My Media: That's the place I was looking forward to play with. All the uPNP/DLNA hosts show up here: it found my mobile phone Sony Ericsson G705Synology DS109 and computers (XP SP3 and Seven).
Re-scanning the network will never give twice the same result, so several attempts may be needed to get the full list.

Listing the media content can be randomly fast or sluggish even with the latest firmware.

The sluggishness of the unit is partially due to the remote and using a Logitech Harmony instead gives a much better response, but in addition, the system also sometimes stops responding for several seconds for no apparent reason.

The default view is not the best and pressing the Display button on the remote brings a more convenient "zoomed-out" view of the files list.
Inside My Media section, the content is again separated into three distinct kind of content: Movie, Photo and Music.

My Media > Movie: Wi-Fi 802.11n is especially welcome for playing video content, however my wireless router is still 802.11g.
This, combined to the occasional traffic from the Wii, the IP Cameras, and the weak signal caused by the distance from the router, resulted in occasional choppy Divx playback from my Synology NAS. This could be improved  by a proper buffering, but the LG BD390 doesn't seem to do any.

My Media > Photos: I found a bug in this part: the rendering of pictures from my NAS was awfull, as if a mosaic effect had been applied to them. Same from my phone. The same pictures read from a USB drive would show fine. (update: this turned out to be a Synology bug resolved from DSM 2.3-1143)


My Media > Music: the mp3's were played smoothly with no surprise. I just regret that it is such a basic music player, a shuffle function would have been nice.


YouTube: The YouTube browser.
Well, yes it plays videos from YouTube all right. I just don't see myself  spending evenings browsing YouTube videos on the telly, so I won't go there very often.


Setup: also speaks for itself.

In conclusion, some polishing is still needed to make this unit a fully satisfying player, but the potential is really there. Let's see if LG can make some difference here...


Pros:
- very simple to setup
- great set of features
- support many formats
- silent BD/DVD playback

Cons: (with fw 8.08.529.B)
- the player is randomly sluggish
- occasional crashes (not too often)

Cheapest (€223.-) found on eBay by  ITSS-DAMM.

Region hack: multi-region.net

Complete review: see audioholics.com

Support Web Site: www.lge.com
Read More