Android sticks are a great way to convert a normal TV into a "Smart" one, with some of them available from ~40€. However it is worth reading the forums to avoid those many with antenna, power and overheating issues...
 I was looking at the Rikomagic MK802 III as a potential candidate for a while, and was waiting for a version with a soft power off function (most entry-level Android stick must be unplugged physically). In the meantime, I read horror stories about antenna that needed to be relocated outside the box to work and other such experiences that put me off this model.
Within the huge choice of devices, one seemed to stand out:
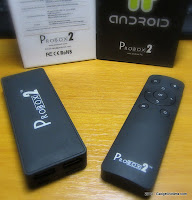
The Probox2 (aka U2host) is a Rockchip RK3066-based device with 1GB RAM and 4GB Flash (of which 2GB for internal storage) and comes with a Air Mouse.

Its most appealing features of this box are:
- Decent overal specs with modest but sufficient storage (a microSD card reader is included)
- Device shutdown can be done from the remote, no need to unplug.
- No overheating, gets warm, not hot! (proper graphite heat sink)
- Good Wi-Fi range
- Gets enough power from standard TV USB port (a USB Power adaptor is also provided but I don't use it).
- Can be controlled from another Android with the Probox2 Ultimate Remote app available.
- 2 full size OTG USB ports, 1 micro-USB for power and memory access, 1 microSD slot, HDMI.
- No crapware, just the essential, and seems to have unrestricted access to Play store.
I won't repeat the already complete review by liliputing.com, but rather go through the troubles I had and how I eventually solved them.
 My unit arrived with a slight problem: after the normal ProBox2 splash screen, and next only show a small portion of the screen height was used showing just the title "Air Mouse Manager".
This turned out later to be a badly flashed unit that needed to be re-installed properly with the Rockship Batch Tool. And that's were the fun begins...especially if you have a Windows 8 PC!
Probox2.com provides instructions for a 4.1.1 upgrade.
Their upgrade tool package contains all the drivers needed to install the "RK30" device.
-11-39-28.jpg) Windows 8 won't accept the drivers unless you "Disable the Driver Signature Enforcement" by rebooting into the Advanced Startup Menu (click on the power icon, hold Shift + click on Restart) and going to Troubleshoot > Advanced options > Startup Settings, then click "Restart", and hit F7 or type "7" in the next screen.
Windows 8 won't accept the drivers unless you "Disable the Driver Signature Enforcement" by rebooting into the Advanced Startup Menu (click on the power icon, hold Shift + click on Restart) and going to Troubleshoot > Advanced options > Startup Settings, then click "Restart", and hit F7 or type "7" in the next screen.
-11-45-41.jpg) From that point, the Windows Device Manager will let you include the unsigned drivers manually (Browse my computer for driver>Show all devices>let me pick from a list of device drivers... as shown in the upgrade instructions). The only detail not explained in the document is which device to choose on the pop-up list, but just remember that ProBox2 is based on RK3066 chip.
From that point, the Windows Device Manager will let you include the unsigned drivers manually (Browse my computer for driver>Show all devices>let me pick from a list of device drivers... as shown in the upgrade instructions). The only detail not explained in the document is which device to choose on the pop-up list, but just remember that ProBox2 is based on RK3066 chip.

 The device icon next will not be very engaging with its exclamation mark, but from that point, you've done all right.
The more tricky part for me was to get the Probox2 recognized by the Rockship Batch Tool. The theory is simple: maintain the little button marked with "U" pressed while plugging the microUSB cable, with the other end in the computer USB port.
The USB port on which I initially performed the driver installation never wanted to work with the Probox2.

 I had to use another USB port (using a secondary USB controller) before the Rockship Batch Tool eventually recognized the device by showing a green square under Connected Devices.
So it may take some perseverance until you see it working. Only then, you will be able to load the firmware and hit the Upgrade button.

The above upgrade is based on the official Probox2 4.1.1 firmware. There's is also a custom one,rooted, provided by w2comp.com and using a different flashing method. Beside the supposed improvements to streaming, codec and overall performance, I found it less stable (a few "Wait/Close"), but I could make the Bluetooth work (official build wouldn't pair anything for me).
The Air Mouse,
This little 2.4 GHz RF remote lets you point and click and allows to access all the necessary functions with just 9 buttons. It includes a microphone if the Android speech recognition works for you.
For my use (accessing the movies on my Synology NAS from the bedroom TV), this is ideal to use in the darkness. I get a functional range of about 4 meters which is just enough.
 The Probox2 Ultimate Remote app is a free alternative which allows you to control the Probox2 from another Android phone or tablet.
In general I cannot fault this little gem, the Wi-Fi range is absolutely honorable compared to my phone and tablet. The fact that a USB port is enough to power the device is a great plus. At no time the box was more than just warm, no overheating whatsoever. USB Accesories are easy to plug thanks to the 2 full sized USB ports (tried wireless mouse and keyboard so far). No fuss, it works as designed, end of story!
The Probox2 is sold by w2comp.com for ~65€ and so far seems to be a very good choice to smartify any TV equipped with HDMI .
I could also appreciate the fast response from w2comp on some technical after-sale queries, another good point!
Read More
 I was looking at the Rikomagic MK802 III as a potential candidate for a while, and was waiting for a version with a soft power off function (most entry-level Android stick must be unplugged physically). In the meantime, I read horror stories about antenna that needed to be relocated outside the box to work and other such experiences that put me off this model.
Within the huge choice of devices, one seemed to stand out:
The Probox2 (aka U2host) is a Rockchip RK3066-based device with 1GB RAM and 4GB Flash (of which 2GB for internal storage) and comes with a Air Mouse.

Its most appealing features of this box are:
- Decent overal specs with modest but sufficient storage (a microSD card reader is included)
- Device shutdown can be done from the remote, no need to unplug.
- No overheating, gets warm, not hot! (proper graphite heat sink)
- Good Wi-Fi range
- Gets enough power from standard TV USB port (a USB Power adaptor is also provided but I don't use it).
- RF Air Mouse, just fine to use in the darkness of a bedroom.
- Can be controlled from another Android with the Probox2 Ultimate Remote app available.
- 2 full size OTG USB ports, 1 micro-USB for power and memory access, 1 microSD slot, HDMI.
- No crapware, just the essential, and seems to have unrestricted access to Play store.
- Bluetooth
I won't repeat the already complete review by liliputing.com, but rather go through the troubles I had and how I eventually solved them.
 My unit arrived with a slight problem: after the normal ProBox2 splash screen, and next only show a small portion of the screen height was used showing just the title "Air Mouse Manager".
This turned out later to be a badly flashed unit that needed to be re-installed properly with the Rockship Batch Tool. And that's were the fun begins...especially if you have a Windows 8 PC!
Probox2.com provides instructions for a 4.1.1 upgrade.
Their upgrade tool package contains all the drivers needed to install the "RK30" device.
-11-39-28.jpg) Windows 8 won't accept the drivers unless you "Disable the Driver Signature Enforcement" by rebooting into the Advanced Startup Menu (click on the power icon, hold Shift + click on Restart) and going to Troubleshoot > Advanced options > Startup Settings, then click "Restart", and hit F7 or type "7" in the next screen.
Windows 8 won't accept the drivers unless you "Disable the Driver Signature Enforcement" by rebooting into the Advanced Startup Menu (click on the power icon, hold Shift + click on Restart) and going to Troubleshoot > Advanced options > Startup Settings, then click "Restart", and hit F7 or type "7" in the next screen.-11-45-41.jpg) From that point, the Windows Device Manager will let you include the unsigned drivers manually (Browse my computer for driver>Show all devices>let me pick from a list of device drivers... as shown in the upgrade instructions). The only detail not explained in the document is which device to choose on the pop-up list, but just remember that ProBox2 is based on RK3066 chip.
From that point, the Windows Device Manager will let you include the unsigned drivers manually (Browse my computer for driver>Show all devices>let me pick from a list of device drivers... as shown in the upgrade instructions). The only detail not explained in the document is which device to choose on the pop-up list, but just remember that ProBox2 is based on RK3066 chip.
 The device icon next will not be very engaging with its exclamation mark, but from that point, you've done all right.
The more tricky part for me was to get the Probox2 recognized by the Rockship Batch Tool. The theory is simple: maintain the little button marked with "U" pressed while plugging the microUSB cable, with the other end in the computer USB port.
The USB port on which I initially performed the driver installation never wanted to work with the Probox2.

 I had to use another USB port (using a secondary USB controller) before the Rockship Batch Tool eventually recognized the device by showing a green square under Connected Devices.
 So it may take some perseverance until you see it working. Only then, you will be able to load the firmware and hit the Upgrade button.

The above upgrade is based on the official Probox2 4.1.1 firmware. There's is also a custom one,rooted, provided by w2comp.com and using a different flashing method. Beside the supposed improvements to streaming, codec and overall performance, I found it less stable (a few "Wait/Close"), but I could make the Bluetooth work (official build wouldn't pair anything for me).
The custom launcher is well designed for a SmartTV context and I'll give it a chance for a while before trying something else. The set of pre-installed application is minimal, and that's fine by me, no crapware! The eHomeMedia app seems a good DLNA client/server solution but the Synology DSVideo app provides a better experience if your movie collection is on a DiskStation NAS. I confess I also didn't give it's chance to the included player and immediately installed MX Player. The decent Explorer app would be enough to browse the local and remote files, but again, I'm used to ES File Explorer...I'm filling in my own crapware it seems... :-)
The Air Mouse,
This little 2.4 GHz RF remote lets you point and click and allows to access all the necessary functions with just 9 buttons. It includes a microphone if the Android speech recognition works for you.
For my use (accessing the movies on my Synology NAS from the bedroom TV), this is ideal to use in the darkness. I get a functional range of about 4 meters which is just enough.
 The Probox2 Ultimate Remote app is a free alternative which allows you to control the Probox2 from another Android phone or tablet.
In general I cannot fault this little gem, the Wi-Fi range is absolutely honorable compared to my phone and tablet. The fact that a USB port is enough to power the device is a great plus. At no time the box was more than just warm, no overheating whatsoever. USB Accesories are easy to plug thanks to the 2 full sized USB ports (tried wireless mouse and keyboard so far). No fuss, it works as designed, end of story!
The Probox2 is sold by w2comp.com for ~65€ and so far seems to be a very good choice to smartify any TV equipped with HDMI .
I could also appreciate the fast response from w2comp on some technical after-sale queries, another good point!


