I'll try to second the network settings chapter in the IP camera manual (even though a true geek never reads the manual) to help passing the blocking points of the wi-fi setup procedure.
This is based on a Foscam camera but can certainly be used with other wireless cameras.
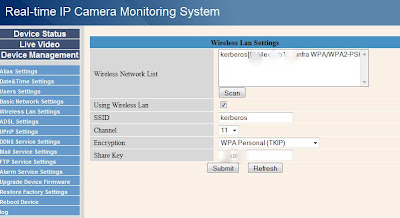
The step that nobody has problem with (usually) is connecting the camera to the network with the Ethernet cable. When this is done, the wireless settings can be accessed from the Administrator section and that's where a first very common error is made:
 Many beginners enter an arbitrary name in the SSID field, thinking it will identify the camera on the network. What is needed here, is the name of an access point (typically your wi-fi router).
Also make sure that you choose a supported encryption and prefer WPA to WEP if possible. The channel should also match the one used by the router.
In the most recent firmwares, there is a scan button to detect available access points automatically. If nothing appears after scanning you may need to click the refresh button.
 The next step is often unclear as well to newbies: once you click on the Submit button, the camera will start a countdown of 30 seconds to restart. This is the moment to unplug the Ethernet cable. You should have done this within 10 seconds, on FI8908W, it is typically before you hear the short click from the camera speaker preceding the initial rotation sequence. The camera will start looking for a network and, at the condition that there is no more Ethernet connection, a wireless access point will be searched.
If everything goes well, after a few seconds, the green led will the blink much faster than before, indicating that it achieved a wireless connection.
The final step is to check your router's DHCP page for any incoming request, this is likely to be your ip camera (If nothing appears, ensure that you disabled the MAC filtering on your router for the time of the procedure).Just use that ip address in the url of your browser to confirm it is what you expect.
You can then add this address to your static DHCP list and MAC filter exceptions.
Note: The camera needs the router to be in broadcast mode in order to connect, otherwise it will not find the AP. This limitation has been reported to Foscam.

